Rich Fogel’s 1980 CR125 Resto
 So, you have a pile of junk sitting in your garage from years of collecting parts and donor bikes to make yourself that race bike. Well, this is what I had sitting there. Or so I thought. As I was taking stock of parts that I had lying around after building about five 1980 CR 125 race bikes, I came to realize that I had enough parts to build a running bike. An ugly one, but running nonetheless. But who wants an ugly bike? Not me! So, follow along and lets see what I’ve learned from VMX magazine on how to build a cheap racer. So, you have a pile of junk sitting in your garage from years of collecting parts and donor bikes to make yourself that race bike. Well, this is what I had sitting there. Or so I thought. As I was taking stock of parts that I had lying around after building about five 1980 CR 125 race bikes, I came to realize that I had enough parts to build a running bike. An ugly one, but running nonetheless. But who wants an ugly bike? Not me! So, follow along and lets see what I’ve learned from VMX magazine on how to build a cheap racer.
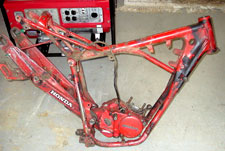
The frame was solid but rusty, the bottom end perfect, wheels were good enough for a race bike and the plastic was sun faded. Needed; a new top end, an air filter a chain and some fresh paint!!!
 This is not a job to be rushed if you want a decent looking bike. Time will be the biggest expense. You don’t really need to strip anything; just careful sanding and more sanding will get you in the right place for paint. Ah, paint. Don’t despair if you don’t own a compressor and paint gun. Mine never left the shelf. This was a rattle can project. So, lets start. This is not a job to be rushed if you want a decent looking bike. Time will be the biggest expense. You don’t really need to strip anything; just careful sanding and more sanding will get you in the right place for paint. Ah, paint. Don’t despair if you don’t own a compressor and paint gun. Mine never left the shelf. This was a rattle can project. So, lets start.
The frame and swingarm were sanded until the painted parts blended in with the bare parts of metal, wiped down with prep-sol and hung with coat hanger from the ceiling. I taped the steering head, frame tag and swingarm bushing area. A primer coat with periods to allow drying and then final paint. I used light coats and full strokes. That is, I would start painting before I hit the surface of the frame and continue until I was past the tube. I would let the paint tack up and apply another coat. My final coat was laid on a little heavy for a nice finish.
With the motor, I had to get a bit more involved with the sanding and prep work. I had to wet sand the motor and I finished with a scotch-brite pad. Some tape and prep-sol and I was back painting. So far so good!
The forks looked like crap, so I took some advice from another Vintage racer, Brian Rivers and started wire wheeling the lower tubes. Then by hand, I used emery paper going around the lower leg. Not top to bottom, but around from the top to the bottom. I started at the top and as I got the look I wanted, I moved down and continued until I was finished. At this point some folks will clear-coat the lower legs. I won’t be doing that because to me, it’s easier to do a touch up every now and again than to do both legs over from scratch.
 Plastic? Hope you got the time. If you have a decent set of plastic, even with Sun fading, you can make it look nice. Not perfect, but nice enough for any race bike. When the Sun has faded the plastic, the first step is to remove a layer of plastic until it looks like the original color. I do this with a long razor type blade from those knifes that you can break off the end and have a new edge. They come in packs of five at most hardware stores. I use the blade all by itself and pull it across the plastic removing small amounts of each layer until I get down to decent plastic. This takes a lot of time and some skill (Heck, I can do it!), but you do not want to damage the plastic anymore than it already has been. When you have removed all the fading the next step differs with whomever you are talking to. Some will use the product, plastic restore (I did) others will use 3M rubbing compound for automotive bumpers, while others have their own secret method. Follow the directions on the box of plastic renew and you will get excellent results. Do not rush any of the steps though. If you do not wet sand completely, you might as well have not even attempted this project. As I stated, time will be your biggest expense! Plastic? Hope you got the time. If you have a decent set of plastic, even with Sun fading, you can make it look nice. Not perfect, but nice enough for any race bike. When the Sun has faded the plastic, the first step is to remove a layer of plastic until it looks like the original color. I do this with a long razor type blade from those knifes that you can break off the end and have a new edge. They come in packs of five at most hardware stores. I use the blade all by itself and pull it across the plastic removing small amounts of each layer until I get down to decent plastic. This takes a lot of time and some skill (Heck, I can do it!), but you do not want to damage the plastic anymore than it already has been. When you have removed all the fading the next step differs with whomever you are talking to. Some will use the product, plastic restore (I did) others will use 3M rubbing compound for automotive bumpers, while others have their own secret method. Follow the directions on the box of plastic renew and you will get excellent results. Do not rush any of the steps though. If you do not wet sand completely, you might as well have not even attempted this project. As I stated, time will be your biggest expense!
Wheels, this is the big buck area that can make or break a bike. I was lucky as I had a wheel set that was perfect for a race bike. They just needed some love. WD-40 and rag and lots of time got these hubs looking quite nice. Oh, I also used a bit of worn out scotch-brite to clean some accumulated gunk off the hubs first. The spokes also got a touch of used scotch-brite. Not so much though as they were looking good. And here is the rub; if you can’t get your wheels to look halfway decent, then the bike as a whole won’t present itself well. If you do not have something good to start with, it can cost a fortune to get wheels rebuilt. At that point we are talking a whole another level of restoration. Call Dr. Joe Abbate at this point. What I would have done is to start horse trading for a decent set of wheels if I didn’t have something to work with.
 Now it is time to give away another secret. The bench mounted wire-wheel. Do you have one? If not, go out and get one! There is nothing like this tool to help you along in any project that requires rust removal from small parts like foot pegs and rear brake levers, bolts, etc. These got the wire-wheel, then prepped and place on a piece of cardboard to get the flat black treatment. I cleaned the backing plates and gave them a black stain finish along with the triple clamps. The pipe got the royal treatment using high-temp grill paint. Now it is time to give away another secret. The bench mounted wire-wheel. Do you have one? If not, go out and get one! There is nothing like this tool to help you along in any project that requires rust removal from small parts like foot pegs and rear brake levers, bolts, etc. These got the wire-wheel, then prepped and place on a piece of cardboard to get the flat black treatment. I cleaned the backing plates and gave them a black stain finish along with the triple clamps. The pipe got the royal treatment using high-temp grill paint.
What now? It’s assembly time of course!
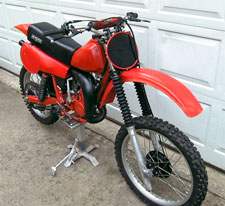
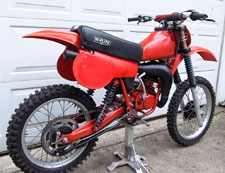
There are very few tricks to a race restoration other than time. You will not have a ten-point restoration, but you have a good-looking race bike that will be very easy to bring back to this condition at the end of every season with very little work. Give it a try, you may find that you really like the way your bike looks...Race Ready!
***
|